Viewing and Playing Recordings
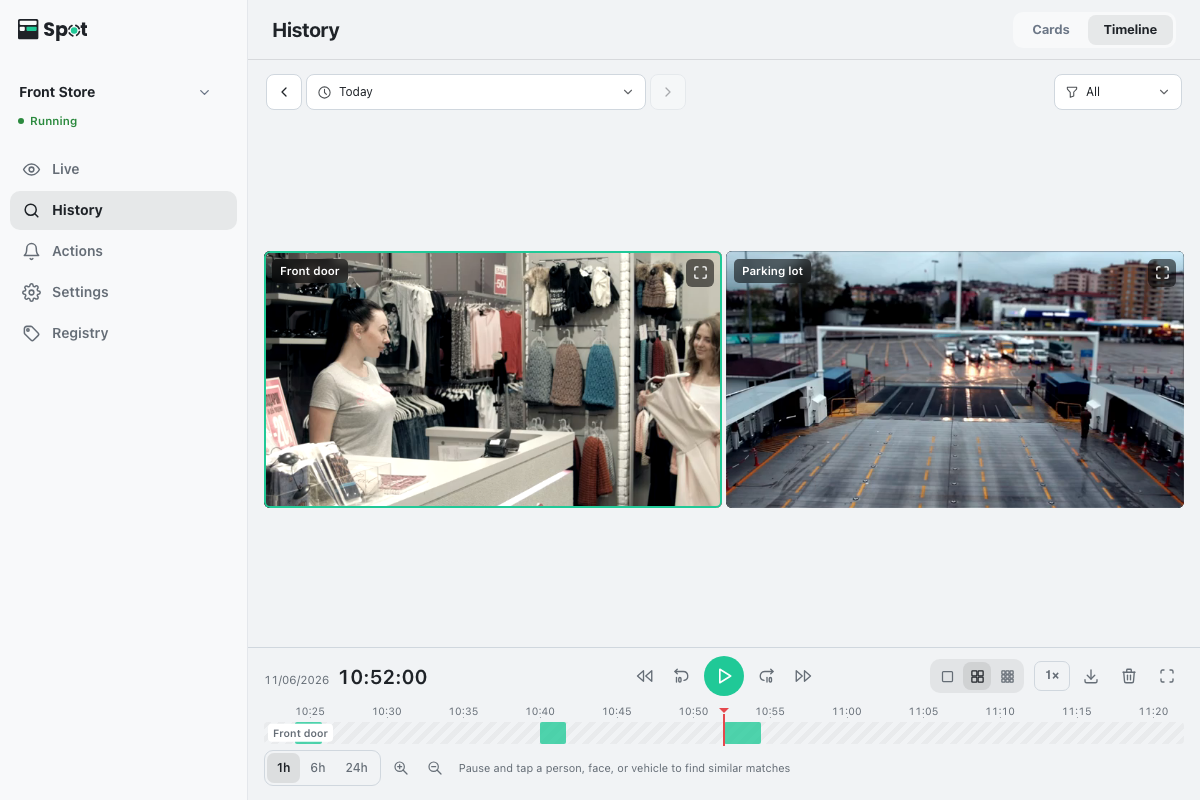
The timeline on the History tab plays the recordings of all cameras together on one time bar.
- On the History tab, select Timeline (desktop: at the right end of the title row; phone: from the list at the top of the screen). The tab opens on Cards by default (see Viewing by Person). On device software 2.1.4 or earlier, the switch shows People, Vehicles, and Timeline instead.
- Click the range at the top, then click Today, Yesterday, or another option under Quick ranges. If you pick dates in the calendar, click Apply. If the current playback position is inside the new range it stays there; otherwise playback is cued to the start of the latest recording in the range.
- Click the play button or press the Space key. All cameras play in sync. Gaps between recordings are skipped, and playback stops at the end of the last recording.
- Drag or click the time bar to move to the time you want. The red line in the middle marks the time being played. Clicking a spot without recordings jumps to the next recording.
Each camera appears as a tile at the top, showing the video at the time under the red line. Click a person, face, or vehicle box to open the scene view at that moment (see Finding a Person).
Camera tiles
- With one camera, a single tile is shown; with 2 to 4 cameras, two tiles per row (a 2×2 grid for 4); and with 5 to 9 cameras, three per row (a 3×3 grid for 9). With more than 9 cameras, the tiles are split into pages, with arrow buttons (Previous camera page, Next camera page) and a page number such as 1 / 2 below.
- Desktop: With 2 or more cameras, use the layout buttons to the right of the playback controls to choose 1, 4, or 9 tiles. If there are more cameras than the split holds, the tiles are split into pages. Your choice is saved in this browser.
- The camera name is at the top left of each tile. When nothing was recorded at that time, the tile shows No recording; for a recording still in progress it shows a red dot and Recording. A loading indicator appears while the video loads.
- When the recording at that time is not indexed yet, Not indexed yet appears at the bottom left of the tile. Until it is indexed, you cannot pick people in that recording to search.
- Desktop: click a tile to select that camera; the time bar then shows its recordings. Double-click a tile, press Enter, or click the enlarge icon (Enlarge) at the top right of the tile to show that camera alone. To return to the grid, click the icon in the same place (Show all cameras) or press Esc.
- Phone: one camera is shown at a time. Use the chevron icons at the sides (Previous camera, Next camera) to switch cameras. Double-tap the left half of the picture to go back 10 seconds, or the right half to go forward 10 seconds.
Playback buttons
The row above the time bar shows the date and time on the left, and icon buttons in the middle and on the right. Hover over a button to see its name and shortcut key.
| Button | Action |
|---|---|
| Previous recording · Next recording | Jumps to the start of the previous or next recording. |
| Back 10 seconds · Forward 10 seconds | Moves 10 seconds at a time. |
| Play · Pause | Switches between playing and paused. |
| Playback speed | The button showing the current speed, such as 1×. Choose 0.5×, 1×, 2×, 4×, or 8×. With 5 or more tiles shown, up to 4× is available. |
| Download range · Delete range | The download icon and the trash icon (see Downloading and Deleting a Range). |
| Full screen | Shows the timeline on the whole screen. While playing, the controls hide after 3 seconds of inactivity. |
Listening to recorded audio
Recordings from cameras with Record audio turned on include audio (device software 2.2.0 or later). Recordings with audio show a speaker icon.
- A single camera on the timeline (one-camera split or enlarged) and the scene view play with audio on. If the browser blocks audio, playback starts muted; click the speaker icon to unmute.
- In the 4 and 9 splits, audio starts muted, and only one camera plays audio at a time.
- Video files saved with range download include the audio.
The time bar
- The red line stays in the middle and the bar moves under it. Tick marks show the time of day, and the date (month/day) at midnight.
- The bar shows the recordings of the selected camera and is labeled with its name. For a camera that records Always, continuous recording appears as a pale band, with detected recordings in color on top. Hatched recordings are not indexed yet.
- Scroll the mouse wheel to move through time. Hold Ctrl (⌘ on a Mac) while scrolling, or pinch with two fingers, to zoom. The 1h, 6h, and 24h buttons and the zoom icons below the bar also change the zoom. The bar can show from 5 minutes to 24 hours at a time; zoom buttons longer than the selected range are hidden.
- A hint appears below the bar. While paused, the hint depends on which recognition types are on, for example Pause and tap a person or face to find similar people; while playing on a desktop it reads Scroll to move in time, Ctrl+scroll to zoom.
- If No recordings in this period. is shown, choose another range.
Timeline keyboard shortcuts
| Key | Action |
|---|---|
| Space | Play or pause |
| ← · → | Back or forward 10 seconds |
| Shift + ← · → | Back or forward one frame (pauses playback) |
| J · L | Slower or faster playback |
| Z · X | Previous or next recording |
| [ · ] | Set the start or end of the range to the current position |
| F | Full screen |
| Enter | Enlarge the selected camera |
| Esc | Close what is open, one at a time: the speed menu, the range panel, the enlarged camera, then full screen |
More on choosing a range
The range being viewed is shown at the top. The arrows on either side move to the previous or next range of the same length. You cannot move forward from a range that has not ended yet, such as Today.
- Today, Yesterday, Last hour, Last 6 hours, Last 24 hours, and Last 7 days under Quick ranges apply immediately.
- In the calendar, clicking one day selects that day; clicking a second day selects the range between them. Days after today cannot be selected.
- Adjust the hours under From and To, in one-hour steps.
- Cancel closes the picker without applying changes.
Scene view playback controls and keyboard shortcuts
The scene view is the player that opens when you click a box on the timeline, or a tile in search results or a person card. Click the picture to play or pause. When it was opened from search results or a person card, the chevron icons at the sides (Previous item, Next item) move to the previous or next recording, and on a phone a horizontal swipe does the same. A scene view opened from the timeline has neither these buttons nor a delete button.
The tick marks on the progress bar are the points where a person was indexed in that video, and the red marker is the Event moment.
| Control | Action |
|---|---|
| Progress bar | Drag to move through the video. Click a tick mark to jump to that point. |
| Three buttons above the bar | Previous indexed point, play/pause, and Next indexed point. Use them to skim only the moments where a person was detected; the current point and the total number of points are shown below. |
| Wheel · two fingers | Zoom into the picture, up to 4×, then drag to move around. |
The scene view's keyboard shortcuts differ from the timeline's: K or Space play and pause, J · L back and forward 10 seconds, , · . one frame at a time (pausing the video), F full screen (where supported), and ← · → previous and next recording. While the progress bar has focus, ← · → move back and forward 5 seconds instead.
When the Scenes list is shown instead of the timeline
The Scenes list is shown instead of the timeline in the cases below. The timeline is also not shown while search results are displayed.
- No camera records video. The screen switch then offers Scenes instead of Timeline.
- At least one of the cameras you are viewing saves photos only. If nothing is checked in the camera filter, every camera counts. The screen switch still offers Timeline.
- On the History tab, select Scenes or Timeline (desktop: at the right end of the title row; phone: from the list at the top of the screen).
- Click the range above the list and choose the range to view.
- Click the scene you want to see. Its video plays right away; a recording with only a photo shows the photo enlarged.
- Scenes are listed newest first, each labeled with the time and camera name.
- When a person stays a long time, recording is split into several scenes after a certain size or duration. Each part is played separately.
- Above the list are Select all, the photo size (Small, Medium, Large), and the camera filter, where you choose All or check the cameras to show.
- While the list is scrolled, new recordings do not shift it. n new scenes appears instead; click it to show them.
- Drag the handle of the time bar along the right edge to see the time at that position; when you release it, the list reloads from that time. If nothing was recorded then, the closest earlier recordings are shown. The back-to-top button at the bottom right returns to the newest recordings.
- Deleting: hovering over a tile shows a trash icon (Delete this item) for deleting one recording; to delete several, select them and use Delete selected in the toolbar. The player also offers Delete this record. Deleted recordings cannot be restored, and recordings still in progress are not deleted. Recordings cannot be deleted from search results or from an open People card. If a recording's file is in use, it is kept and n scenes could not be deleted because their files are in use. Try deleting them again shortly. is shown.